
Introduction
Microsoft Power Virtual Agents is a low-code platform that allows you to create conversational bots to automate customer service tasks. This platform provides a user-friendly interface that enables you to easily design and implement chatbots to handle common customer inquiries and support requests.
Voice channels are an integration with Power Virtual Agents that enables you to add voice recognition capabilities to your bots. This allows customers to interact with your bot using voice commands, making it more natural and convenient for them to get the information they need. The Voice Channel uses Microsoft Azure to perform speech recognition, which makes it easy to add this feature to your bots without having to write any code.
Setting up a trial environment for Dynamics 365 Customer Service
Voice channels has seamless integration with Dynamics Omnichannel / Customer Service. That means to set it up for our nice demo we want to create a trial for Customer service first.
Go to https://dynamics.microsoft.com/en-us/dynamics-365-free-trial/
See this article to set that up and use that account to create the trial.
Setting it up will just take a few minutes.
The trial will have a Voice channel already set up, so that is absolutely perfect.
This trial will also provision a Power Virtual Agent including hand-overs and support for voice channels.
Setting up a trial environment for Power Virtual Agents
To get started with Power Virtual Agents, you will need to start a free trial by visiting https://powerva.microsoft.com/. After this, you will be taken to the Power Virtual Agents dashboard where you can create and manage your bots.
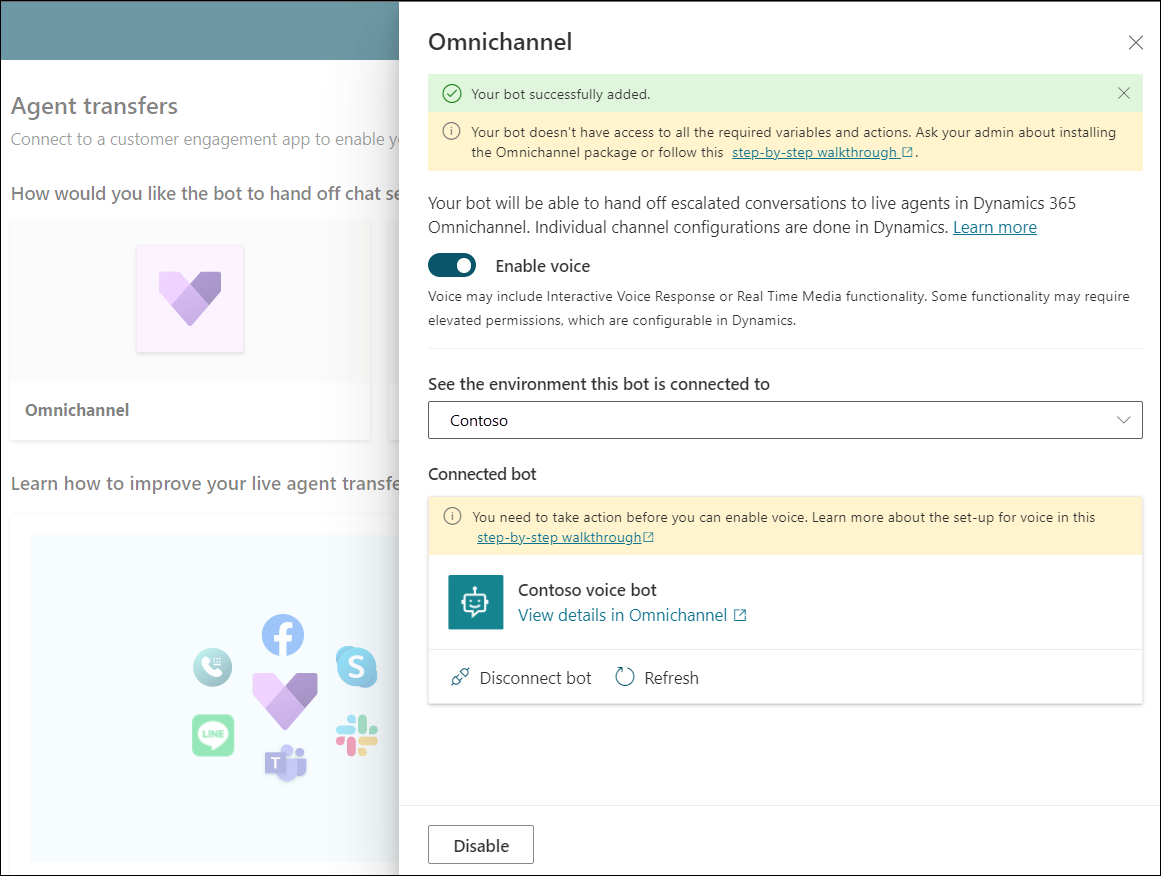
Once you have created your trial, you can configure the voice channels. Go to the provisioned bot "Customer Service Trial Virtual Agent" and then select the "Settings" menu and select "Agent tranfers" -> "Omnichannel" to verify that this bot is indeed connected to your Customer Service trial instance.
Connecting the voice bot to Dynamics Omnichannel and performing handover
To connect the voice bot to Dynamics Omnichannel, you need to set up Omnichannel in Dynamics 365. Luckily this trial took care of that for us.
Click on the "View details in Omnichannel" (in the image above) and then choose "Phone numbers" from the left navigation. Note down the connected phonenumber so we can use that later to try out our Voice bot.
From the Omnichannel admin center, you can configure the settings for your channel, such as the skill groups and routing rules. This will allow you to manage and monitor your voice bot interactions through Dynamics 365, as well as route them to the appropriate agents based on the customer's needs.
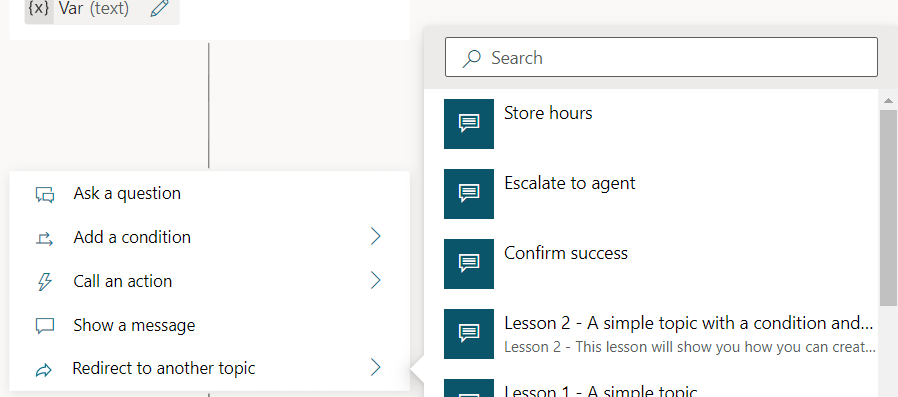
Connecting it to Omnichannel gives us the option to also do handovers from the bot to an actual human agent. To do this we can choose to add an action to any topic by using the "Redirect to another topic" -> "escalate to agent" block.
Now use it :)
So now that everything is in place we can actually start and play with our bot.
Head over to the Topics section of your bot. Add questions, topics, messages, hook up Power Automate flows to get data based on your input (voice or text) and see in action how powerful this set up can be.
Summary
In this blog post, we covered how to set up a trial environment for Microsoft Power Virtual Agents and add Voice Channels / Voice Bot capabilities. Finally, we explained how to connect the voice bot to Dynamics Omnichannel and perform handover to a live agent when needed. With this information, you can now create your own voice bot and start automating customer service tasks.
Comments